Rendering Equation Interactions
The Renderer tab for Equation interactions allows you to select the buttons to include in the on-screen keypad, enter static text in the response area, and create answer fields. When selecting buttons to include in the keypad, you can add individual buttons or an entire row or tab of buttons.
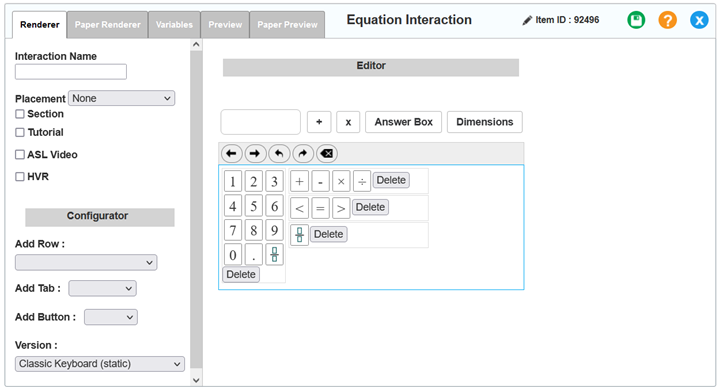
Figure 56: Equation Interaction Editor Window: Renderer Tab
To complete the Renderer tab for an Equation interaction:
1.To set keypad type, click the Version drop-down list and select either of the following:
- Classic Keyboard (static): When the student views the item, the keypad will always appear directly below the input area.
- Modern Keyboard (inline/floating):
i.From the Keyboard Style drop-down list, select floating or static. If you select floating, then when the student views the item, a keypad button will appear in the input area, and clicking the button will open a floating keypad.
ii.Optional: To hide the keypad from the student altogether, clear the Show Keyboard checkbox.
2.Optional: To add buttons to the keypad template in the Design panel, do any of the following:
- To add a row of buttons, select an option from the Add Row drop-down list in the Configuration panel. The selected button group appears on the keypad template in the Design panel.
- To add an entire tab of buttons, select an option from the Add Tab drop-down list in the Configuration panel. The selected tab name appears at the top of the keypad template. To view the added buttons, click the tab name.
- To add individual buttons, select an option from the Add Button drop-down list in the Configuration panel.
3.Optional: To remove buttons from the keypad template in the Design panel, do any of the following:
- To remove a row of buttons, click Delete in that row.
- To remove an entire tab of buttons, click
 next to the tab name.
 - To remove an individual button, select that button so that a green border appears around it. The symbol appears as static text in the response area. Click Delete in that row.
4.Optional: Add or remove input fields as needed. Each input field appears in its own row. (Note that the input fields, to be filled in by you, should not be confused with the answer fields, to be filled in by the student.)
- To add an input field to the response area, click
 beside an existing field.
 - To remove an input field from the response area, click
 beside the field. Note that the interaction must have at least one input field.
5.Optional: To enter static text to appear in the response area, enter the text in an input field. You should enter static text for interactions in which students will fill in the blank of an equation rather than enter a complete equation themselves.
6.Optional: To add an answer field to the response area, click Answer Box next to the input field, or type ## into the input field. If you don’t add an answer field, the whole input field will serve as an answer field for the student, and any static text in it will be editable.
7.Optional: If an input field contains static text plus answer fields, you can set the minimum and maximum display dimensions (height and width in em units) of every answer field in that input field. Each answer field will default to the minimum size and expand to the max to accommodate the text the student enters. If no dimensions are applied manually, the response area will be 1.3 em in height and a standard width; again, the width will expand with entered text. Note that dimensions do not constrain the number of characters; when a student enters more text than can be displayed, a scrollbar appears.
To set the min and max, click Dimensions next to the Answer Box button, then enter non-negative whole numbers in the pop-up that appears. Click OK.
8.To save the entered content, click ![]() in the upper-right corner. Click OK in the confirmation pop-up that appears.
in the upper-right corner. Click OK in the confirmation pop-up that appears.